How to Troubleshoot Gasket Leaks
How to Troubleshoot Gasket Leaks
While the expense of a gasket is usually an afterthought, the ability to troubleshoot gasket leaks are vital to the continued operation of plant equipment and the safety of your employees.
Product leaking onto your floor obviously affects your bottom line, but it can also affect the employee who slips and falls.
Gallagher has been specifying gasket materials for decades, so we know which material to use for which applications. And with specific vendors such as Garlock, we’ll always be able to get you the right material for your specific need.
Read on to learn more from Garlock’s Dave Burgess and Matt Tones on why choosing the right gasket is so vital and how to troubleshoot gasket leaks.
Troubleshooting leaks on flanges
Most plant personnel have been confronted with leaking flange connections in their piping systems.
These leaks often result from mechanical problems such as too much or too little gasket compression.
But sometimes the wrong gasket has been used for a particular service, something that needs to be determined at the start of an investigation into the cause of a leak.

- The process of troubleshooting gasket leaks begins with shutting down the system, draining off the pressure, emptying the fluid and removing all nuts, bolts and washers.
- From there, carefully remove the gasket from the flange, trying to keep it intact. Even a partial gasket can be useful its compressed thickness can be measured.
- Examine the gasket to see if it was damaged during installation. Look for rollover at the edge onto the seating surface or an impression from the flanges showing it was not centered properly.
- Also look for visual clues or physical damage: a faint imprint indicating undercompression, heavy compression and splitting from overcompression and possible erosion. Erosion is caused by abrasive media and typically seen as a curved area that has been removed or has worn away at the gasket’s inner diameter.
- heck for the use of an anti-stick agent, anti-seize compound or silicone on the sealing surfaces of the gasket and flanges. These can impair sealing performance by reducing the friction between the gasket and flanges, allowing the gasket to extrude, crush or blow out.
- Next, inspect the seating surfaces of the gasket, looking for irregular impressions that may have been created by flange imperfections or old gasketing that wasn’t completely removed before a new gasket was installed.
- And finally, measure the gasket’s thickness all around the seating area, using a micrometer with a flat measuring face.
Sharp-pointed micrometers can dig into soft gaskets and give you inaccurate measurements. Calipers are typically unhelpful because the gasket may have uncompressed areas at the inner and outer diameters, preventing them from measuring the true thickness in the compressed area.
These thickness measurements indicate whether a gasket was compressed adequately and evenly. If compression was greater toward the outer diameter than the inner diameter of the seating area, flange rotating or bending has occurred.
*It is important to measure the uncompressed thickness in two or three places in order to calculate compression as a percentage. Note that the original thickness of gasket typically varies slightly from the nominal thickness, so it is important to know the actual uncompressed thickness.
Calculating compression for gaskets
Once you have measured the thickness all around the gasket, calculate the compression as a percentage of the original thickness using this equation:
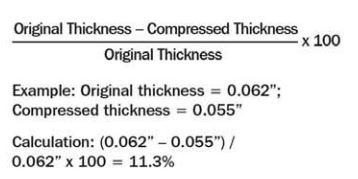
Compare this percentage to the expected compression, noting that available stress on the gasket is calculated using gasket surface area and available bolt load at reasonable bolt stress. In making this comparison, use the manufacturer’s published compressibility values (based on ASTM F36 method), which are typically tested at 5,000 psi compressive stress for fiber and PTFE gaskets.
Compression versus load curves can also be used. Compression on the used gasket that was well above or below the expected compression may show the cause of the leak.
Compression can often vary significantly from one section of a gasket to another. This can indicate misaligned flanges, improperly supported pipes or uneven loading or the bolts. Overcompression can crush or cause splitting in some gaskets, which can be mistaken for chemical attack in rubber gaskets that have been installed in raised-face flanges.
In some cases, manufacturers may be able to supply photos showing the effects of crushing, chemical attack, erosion, “popcorning” from monomer polymerization and other common issues.
Effectively troubleshooting gasket leaks logically begins with determining whether the proper gasket was chosen for the given service conditions. This can accelerate the process by identifying issues that can subsequently be confirmed by examination of the failed gasket. The process can be facilitated further by submitting a sample of the used gasket to the manufacturer for analysis.


